|
|
Post by laser92 on Mar 24, 2009 20:53:38 GMT -5
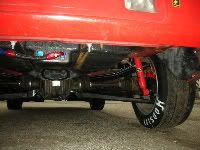
So this is my first build thread..anywhere... Never really was the type to post constant updates on what i'm working on, but most of you here have either seen or heard alittle about my 1g AWD. so here goes. Any questions just ask, i've been tinkering with this particular DSM for a little over 2 yrs, but I'm not gonna post that stuff. So I'll start with this last weekend. Started taking measurements for some adjustable rear upper control arms. Those of you who know me, know that I'm dutch, which means that anything that I think I can make myself, I'm going to. I've seen arms similiar or lesser strength for $200, or even $145 shipped (dsmtalk) but wanted something beefier. That being said, here's where i'm at so far... They're 3/4 and the steel tubes are zinc coated 1 1/4" x14"long. they don't use a tie rod end like others, due to a 'magic' adapter bolt seen in the pics.    And all mocked up, ignore the spaces, nothing is tightened down yet  and obv. the adapter bolt will need to be cut shorter once tight. (below)    |
|
|
|
Post by doggietom on Mar 24, 2009 21:27:19 GMT -5
Nice setup Aj let me know how that works out for ya.
|
|
|
|
Post by 99gst_racer on Mar 25, 2009 8:55:08 GMT -5
Is that just a replacement ball joint stud? Where did you get the bushing and spacers for the other end? Did you make them yourself? I was considering outting a kit like that together. I found some really nice tie rod ends that will work and I have everything in stock here, except for the spacers. I had planned to copy the 3SX ones. PIC |
|
|
|
Post by BLUE71NOVA on Mar 25, 2009 9:31:13 GMT -5
Is that just a replacement ball joint stud? Where did you get the bushing and spacers for the other end? Did you make them yourself? I was considering outting a kit like that together. I found some really nice tie rod ends that will work and I have everything in stock here, except for the spacers. I had planned to copy the 3SX ones. PICThe pro-werks high misalignment spacers could work.  |
|
|
|
Post by 99gst_racer on Mar 25, 2009 11:28:11 GMT -5
The pro-werks high misalignment spacers could work. You're right. I'll have to do some measuring. |
|
|
|
Post by laser92 on Mar 25, 2009 16:09:54 GMT -5
The stud came from Port City Racing in Muskegon, a little pricey though at $20ea. if you can make them w/o these studs, these could be made for about $100 total, and even cheaper if you skimped on the ends.(not recommended) And the spacers are from PCR too, they were a couple bucks too, but could def be made yourself if you felt like saving $10, wasn't worth it to me. the spacer is 1"od, 1/2" thick, and 1/2" center, giving the entire thing a thickness of 1.901inches compared to the factory bushing of 1.875inches. close enough, I like things tight anyways If you'd like I can scan my parts list w/ prices, descriptions etc. to make things easier. I'm sure you could make the same for a little cheaper Paul. A standard grade 8 bolt could have been used on the outside if I felt like drilling the taper out of the spindle. This would have given me a $98 total, but didn't seem like a good idea to me, plus I'd never be able to return to stock if desired. |
|
|
|
Post by laser92 on Mar 27, 2009 13:15:53 GMT -5
So, I made a change to these today, after wondering what exactly the point was in having 1 1/4" arms if the end sized down to 3/4", I went back to Port City Racing this morning and swapped out the gold tubes for solid 1-1/4" hex shaft. This turned out to be easier to adjust too, as the old ones were very hard to turn by hand once the suspension was put at ride height. The hex will allow me to turn it with a wrench. But anyway, I'll post a pic tonight of the finished product. Overall everything fit VERY tight, almost too tight if there is suck a thing, and they give me PLENTY of adjustment, and could even be used with stock springs if desired I believe. Total cost was about $140, as the hex tubes were actually a little cheaper. I've recently started fab-ing my new intercooler piping to go with my new core. I tossed the old, small black rattle canned FMIC for a Punishment core I picked up last January at a steal, and am swapping my old impractical piping to a shorter version in aluminum. I have got most of the couplings in, and have all my piping in, now I just need to take some quick final measures, and tig it all together. Hoping to have most of the piping finished by next weekend.  |
|
|
|
Post by laser92 on Mar 27, 2009 13:25:06 GMT -5
Forgot to add that progress has been slow the past week due to a new addition to the family, something i have been keeping my eyes out for, for quite a while. Finally the right deal came along, and it was like 4 miles from my house. So I picked up a new toy, and probably a pit vehicle.  pretty much all original, elec.start headlight etc. just needed a new battery. The rear diff is even lockable, I'll just leave it open diff for now |
|
|
|
Post by SPOOLD on Mar 27, 2009 14:30:47 GMT -5
holy crap you never see threewheelers anymore! and i'm also pleased to see you refrained from rattlecaning this fmic too. looks good
|
|
|
|
Post by laser92 on Mar 27, 2009 20:53:57 GMT -5
i'm also pleased to see you refrained from rattlecaning this fmic too. looks good Thanks, I think I was trying to hide the old one by rattle canning it, but it can be flipped over for the shiney side out if I changed my mind. This one, there was no going back. Plus, these days, a DSM with a front mount can still be sleeper right?. EDIT* here's the finished control arms, and under the weight of the car. Plenty of room, and adjustability. I couldn't be happier.    |
|
|
|
Post by spaz100 on Mar 28, 2009 0:31:54 GMT -5
props to the kyb's and the punishment racing, they're def underrated. especially with pro-kits for the kyb's.
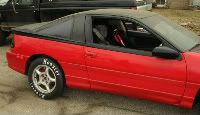
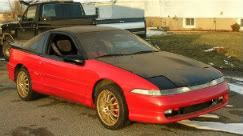
i gotta say your sig pics dont give your car justice, your car is CLEAN now that i see it in larger pics
|
|
|
|
Post by laser92 on Mar 28, 2009 6:36:13 GMT -5
props to the kyb's and the punishment racing, they're def underrated. especially with pro-kits for the kyb's. i gotta say your sig pics dont give your car justice, your car is CLEAN now that i see it in larger pics Thanks!, I actually have the Pro kit's on it too.lol nothing too aggressive. I wonder what it would look like clean?? I've only sprayed it with a hose once. lol like 2 years ago, no soap was involved. |
|
|
|
Post by laser92 on Apr 1, 2009 15:00:09 GMT -5
OK, so now that the rear control arms are done, I've been working on the piping for my punishment core, and the last of my couplings came in the mail today, so I'm hoping to be near completion this weekend. Next on the list... ---Springs / retainers, either BC or stock evo (supposed to be good to 8500, and 280's?) ---cams (still researching) ---4" alum intake/filter in sheetmetal airbox (currently fab-ing, and mock-up) IF ANYONE HAS ANY 4" ALUM. TUBING, PM ME!! possibly stainless too?? My new intake manifold should be here tomorow too might get used on the white car though, I haven't yet decided..... |
|
|
|
Post by laser92 on Apr 5, 2009 11:47:45 GMT -5
small update:: I had a few minutes yesterday to head to a buddies shop (work) to borrow their industrial TIG welder to weld my new intercooler piping. So now that's all done. It's alot more simple I think, and significantly shorter than my old setup.  I also Tig'ed a short 4" piece to the inlet of the punishment core. They don't give you much to go off of, and the 90deg elbow coupling to sweep around the side of the radiator was a few inches off of where the intercooler was supposed to be. So this was my remedy for that. The intercooler outlet was fine, so nothing was done there.  I also made a new tool that I think is pretty cool. It's only use is for putting a bead roll on intercooler piping. I can't take any credit though, I pulled the idea from the dsmtuners archives. It uses a vise grips, washer, and bottom half of a 2 1/2" exhaust flange. (for 2 1/2 IC piping)  Here's a pic of a bead.. I had it set a little deeper than needed, but you get the idea. Not to bad, and took about 1 min/ bead roll. Faster than I thought, It also worked an a scrap piece of steel exhaust I had laying around, I was pretty surprised.  This week is pretty busy for me, so I probably won't be able to do anyting until thursday-ish but next on the list is... *finish bead rolling the piping, clamp everything down * start on the 4" intake and my airbox. (got the alum. for the airbox yesterday too, and put it in the brake to get a few of the bends done upfront.) |
|
|
|
Post by doggietom on Apr 5, 2009 17:05:48 GMT -5
Not to Shabby Aj.
|
|

 and obv. the adapter bolt will need to be cut shorter once tight. (below)